Last updated on February 18th, 2026 at 04:43 am
The Complete Institutional Trading Guide: Concepts, Validation, Strategies, and Advanced Mechanics
| KEY TAKEAWAYS Order Blocks (OBs) represent institutional footprints where large buy/sell orders were placed. They are validated by Fair Value Gaps (FVG) and a Break in Market Structure (BMS).Unlike Supply & Demand zones, Order Blocks are precise, single-candle reference points used in Smart Money Concepts (SMC). Engulfing candle patterns are the retail equivalent; OBs are the superior institutionally grounded version. Success relies on context: alignment with Order Flow, Liquidity, and Breaker awareness. |
1. What Is an Order Block?
In simple terms, an Order Block is a specific price area where large institutions (banks, hedge funds, and other major market participants) have concentrated a significant volume of buy or sell orders. The market frequently returns to these blocks to “rebalance” price before continuing in the direction of the main trend. Think of them as the crime scenes of institutional activity: they show exactly where smart money engineered a price move to collect liquidity from retail traders.
The Technical Definition:
An Order Block represents a change in the state of price delivery. It is identified on the chart by two specific candle types:
- Bearish OB: The last bullish candle (up candle) prior to a strong down move that breaks market structure.
- Bullish OB: The last bearish candle (down candle) prior to a strong up move that breaks market structure.
These areas represent precisely where large participants have placed their orders in the form of sell limits, buy limits, or pending orders before driving the market decisively in one direction.
Why Order Blocks Work: The Institutional Science
Order blocks are not random chart patterns. They represent the strategic positioning of institutional traders and operate on four core mechanics:
- Liquidity Hunting: Institutions need substantial liquidity to fill their enormous order sizes. Order blocks mark areas where they have created imbalances to attract retail traders before making their move.
- Fair Value Gaps: Valid order blocks always feature a “fair value gap,” a price inefficiency where market makers have deliberately moved price quickly, leaving behind an imbalance.
- Price Delivery Algorithm: Markets operate algorithmically. Order blocks represent key reference points within this algorithm that price is drawn back to, repeatedly.
- Accumulation and Distribution: Large institutions cannot enter their full position at once without causing slippage. Order blocks show where they have begun accumulating or distributing positions before the major move unfolds.
2. Bullish vs. Bearish Order Blocks
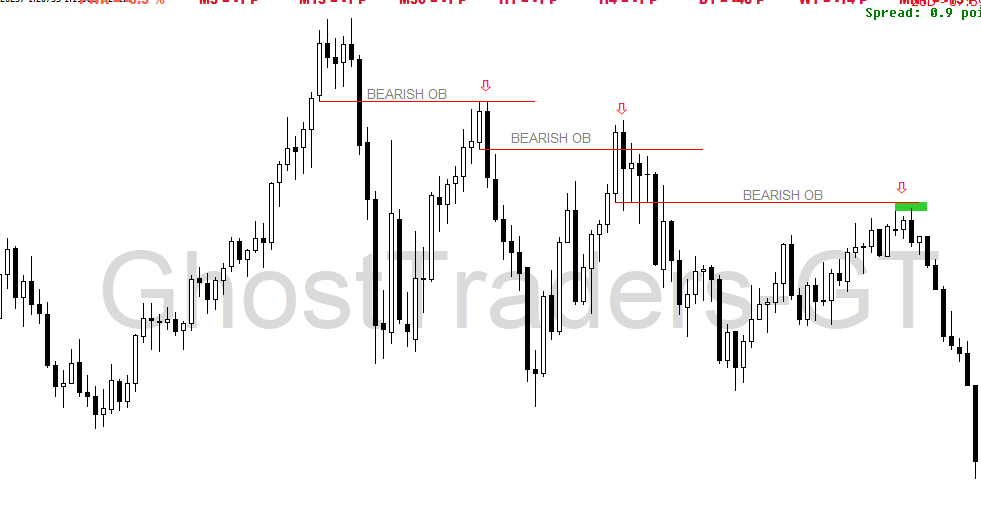
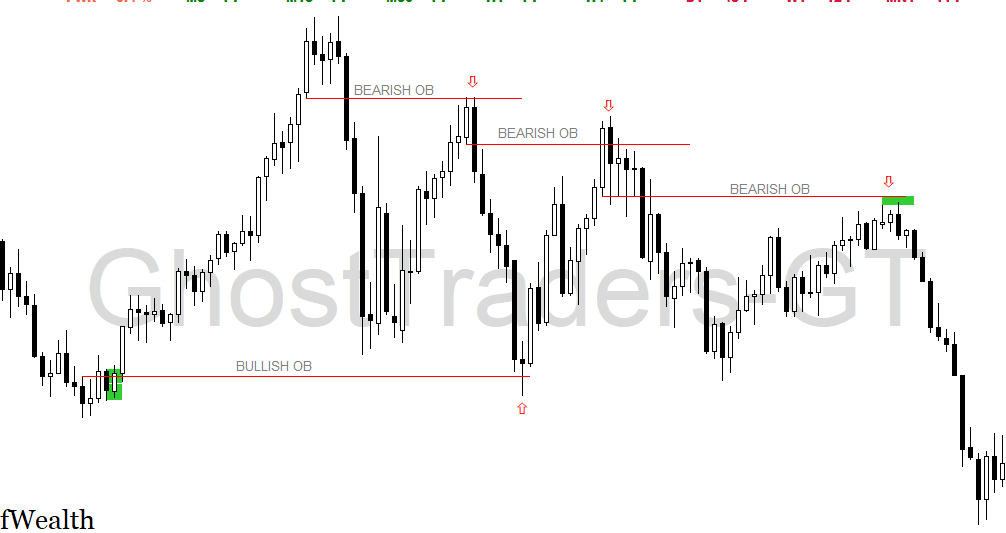
Bearish Order Block
A bearish OB is the final up candle (bullish candle) before a significant price drop. It forms the highest high in a swing point before institutional sellers drive price lower. When price returns to this candle later, the expectation is a reaction to the downside, making it a short or sell opportunity.
| ✓ Validation | Confirmed when the low of the up candle is engulfed by a later violent down move, leaving behind a Fair Value Gap (FVG). |
Bullish Order Block
A bullish OB is the final down candle (bearish candle) before a significant price rally. It forms the lowest low in a swing point before institutional buyers push price higher. When price retraces back to this candle, the expectation is a reaction to the upside, making it a long or buy opportunity.
| ✓ Validation | Confirmed when the high of the down candle is engulfed by a strong up move, accompanied by a Fair Value Gap. |
3. Order Blocks vs. Supply and Demand Zones
These two concepts are frequently confused, but the distinction is critical for precision trading.
| Order Blocks (SMC) | Supply & Demand Zones |
| Precise, single-candle reference points | Broader price areas (zones, not candles) |
| Tied to institutional trading & smart money context | Based on historical buyer/seller dominance |
| Require validation via FVG + BMS | Validated by simple price reaction |
| Provide sniper-precise entry levels | Provide wider, less defined entries |
| Context-dependent (Order Flow, Liquidity) | Context-independent zones |
In short: Order Blocks are the refined, sniper-precision version of Supply and Demand zones. They carry the same foundational logic but are anchored to specific institutional activity rather than broad historical reaction.
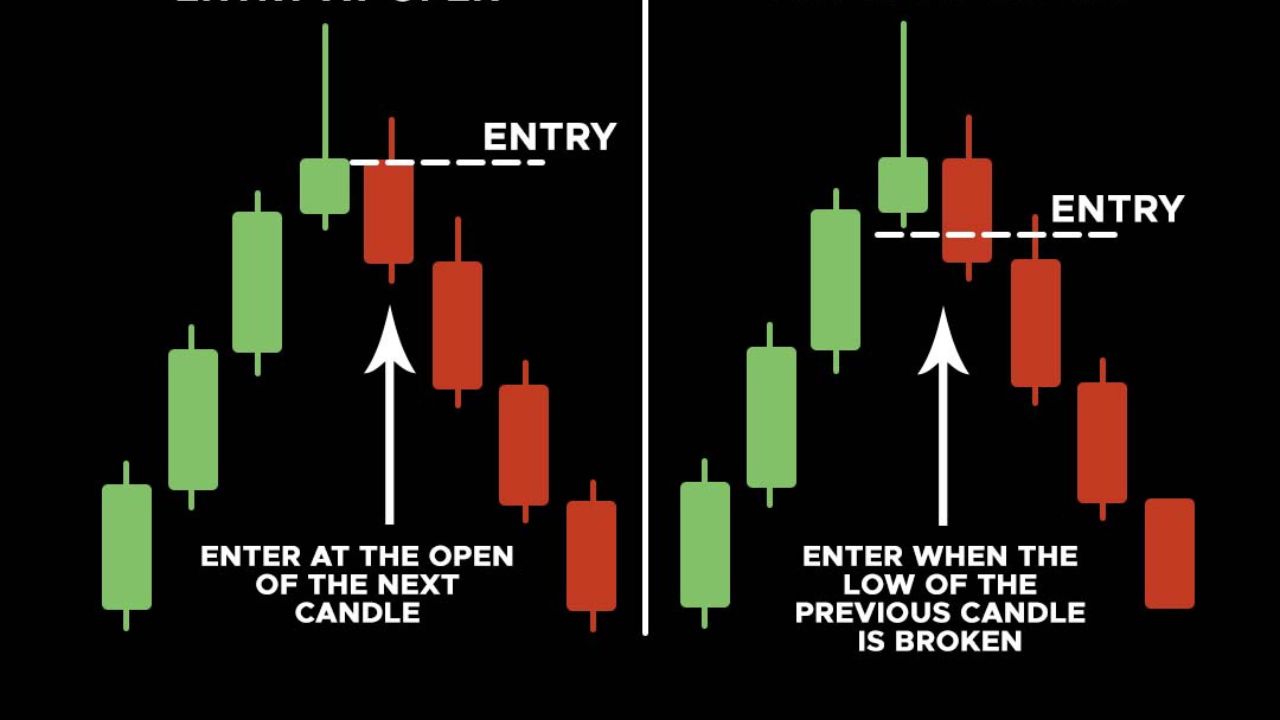
4. Order Blocks and Engulfing Candle Patterns
Many retail traders are familiar with bullish and bearish engulfing candle patterns as reversal signals. What most do not realise is that engulfing candles and order blocks are fundamentally the same concept, just presented from different frameworks.
The Bearish Engulfing Connection
A bearish engulfing candle is the first candle that engulfs the last bullish candle, forming the highest high at a swing point. In smart money terminology, this bearish engulfing candle is the bearish order block. The missing piece, and the reason engulfing candle trades so often fail, is the Fair Value Gap. An engulfing candle without an accompanying FVG is a weak, unvalidated setup.
How to trade it: After the last bullish candle has been engulfed, wait for a retracement into that engulfed candle. This retracement will often align with an FVG, adding confluence. Go short once the price closes the imbalance. This is the “first test” of the bearish order block.
The Bullish Engulfing Connection
A bullish engulfing candle is the first candle that engulfs the last bearish candle, forming the lowest low before the up move. In smart money concepts, this candle is the bullish order block. Again, a Fair Value Gap acts as the validator, and its presence or absence determines whether the setup is worth trading.
How to trade it: After the last bearish candle has been engulfed, wait for a retracement into that previously engulfed candle before making a buy entry. This is the “first test” of the bullish order block. Look for the FVG alignment to add confluence.
| 💡 Key Insight | If you already understand and trade order blocks correctly, there is no need to separately learn engulfing candle patterns. For new traders: order blocks are the superior framework because they explain precisely why engulfing patterns succeed or fail. |
5. How to Validate an Order Block
Not every up or down candle qualifies as an Order Block. Filtering out the weak setups is what separates consistent traders from the rest. Apply all three of the following validation rules before marking any OB as tradeable:
- Must have a Fair Value Gap (FVG): If the move away from the block did not leave a price imbalance between candles, the block is likely weak and should be discarded.
- Must Break Market Structure (BMS): The move must break a previous high (for bullish OBs) or a previous low (for bearish OBs). Without structural confirmation, the block has no institutional weight.
- Must Align with Market Structure: A bearish OB should only be traded in a market that is already bearish (making lower lows). Trading a bearish OB in a bullish trend is low-probability and against institutional flow.
6. How to Find Order Blocks on Your Chart
Step 1: Identify Significant Price Movements
Start by scanning for strong, decisive moves either upward or downward. These impulsive moves signal that institutions have executed large orders. A bullish OB will appear before an upward surge. Look for the last bearish candle immediately preceding the breakout. A bearish OB will appear before a downward surge. Look for the last bullish candle before the breakdown.
Step 2: Look for Consolidation Before the Move
Order blocks are frequently formed during periods of consolidation: tight, sideways price movements before a significant breakout. This consolidation is the footprint of institutional accumulation or distribution. For bullish OBs, look for tight consolidation followed by a sharp upward breakout. For bearish OBs, find consolidation followed by a strong downward move.
Step 3: Confirm the Sharp Breakout
Once you have identified a key candle or consolidation zone, verify that a decisive breakout or breakdown followed. This confirms that institutions completed their orders and the market is moving in their intended direction. A sharp, clean breakout rather than a gradual drift is what you are looking for.
Step 4: Mark the High and Low of the Block
Once the order block candle is confirmed, mark the high and low of that specific candle. This forms the Order Block Zone, which is the area price will need to revisit before the next institutional move. For bullish OBs, use the high and low of the last down candle. For bearish OBs, use the high and low of the last up candle.
7. How to Trade Order Blocks: The Complete Strategy
Trading order blocks requires patience and precision. The core principle is simple: wait for the market to return to the block, confirm institutional defence, and enter in the direction of the original impulse. Here is the full step-by-step process:
Step 1: Identify the Trend and Order Flow
Before anything else, establish the prevailing order flow. Is the market hunting buy-side liquidity above recent highs (bullish flow)? Or sweeping sell-side liquidity below recent lows (bearish flow)? Only look for order blocks that align with this direction. Trading a bearish OB against bullish order flow is one of the most common and costly mistakes in this strategy.
Step 2: Spot the Block and the Liquidity Void
Identify the strong impulsive move that created a Liquidity Void, which is a sharp near-vertical move away from a price area. Locate the specific Order Block candle that initiated this move. The void acts as a magnet, and the OB acts as the springboard: price will be drawn back to fill the void, and your job is to be positioned at the OB when it does.
Step 3: Set Your Limit Order
Once the OB is clearly marked:
- Entry: Place your limit order at the Open of the Order Block body, or at the 50% level (Mean Threshold) of the candle body for tighter entries.
- Stop Loss (Bullish OB): Below the Low of the Order Block candle.
- Stop Loss (Bearish OB): At least 5 pips above the High of the Order Block candle.
Step 4: Wait for the Retracement
Price must trade back into the order block to close the liquidity void. This is where your limit order gets triggered. Do not chase price. If the OB is valid, price will come to you. Patience here is not optional; it is the strategy.
Step 5: Entry Confirmation and The Rejection Test
When price returns to your marked Order Block, do not enter blindly. Instead, drop to a lower time frame and watch for a Market Structure Shift (MSS). If you identified the OB on the 4-hour chart, look for the MSS confirmation on the 15-minute chart. Additionally, watch for pin bars or engulfing rejection candles forming inside the block. These patterns confirm that institutions are actively defending that price level and that the block is holding.
Step 6: Profit Targeting
Set your take-profit at the next key level of support or resistance. If the institutional move is strong and aligns with a larger trend, consider using a trailing stop to maximise the return. The best OB trades deliver 3:1 risk-to-reward or better when executed with proper confluence.
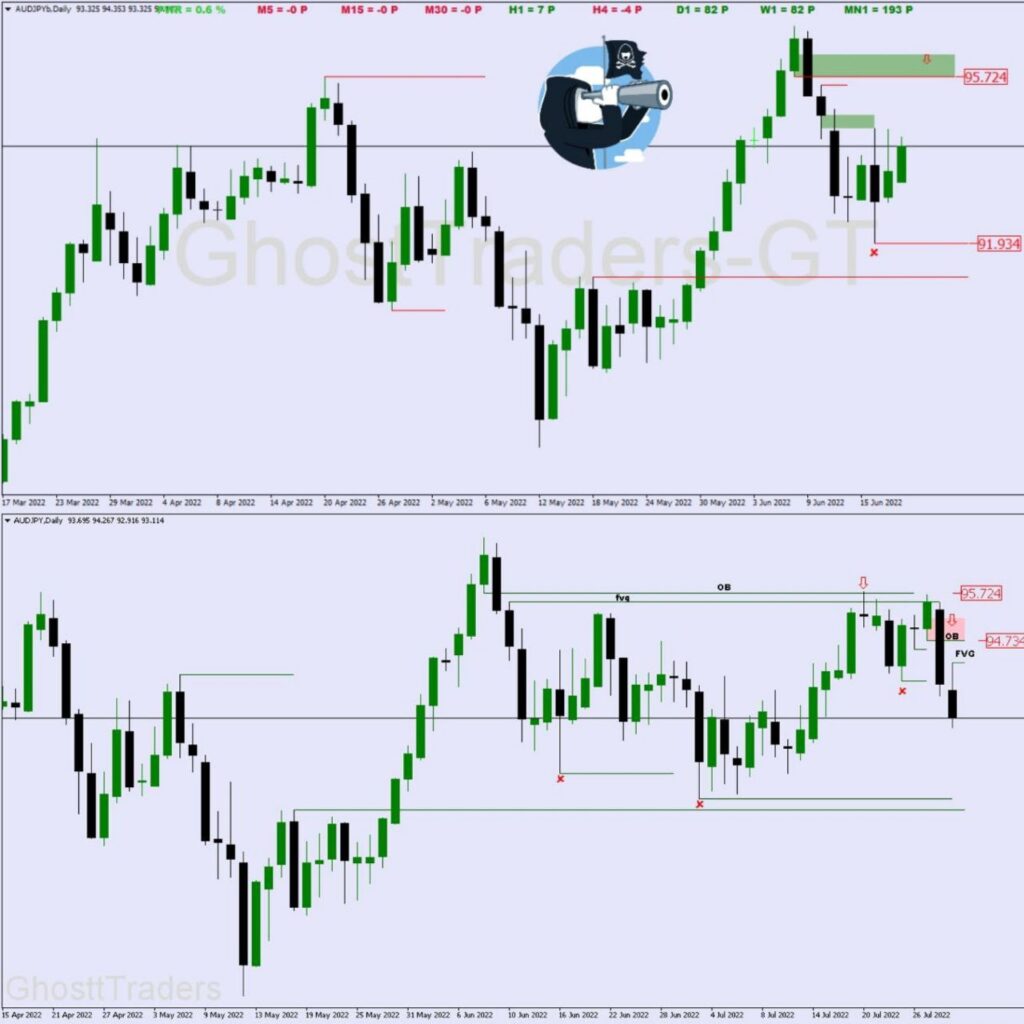
8. Order Blocks and Fair Value Gaps: The Highest-Probability Setup
Fair Value Gaps and Order Blocks are deeply interconnected, and understanding how they work together produces the most powerful setups in the SMC framework.
| Concept | Role in the Setup |
| Fair Value Gap (FVG) | A price inefficiency where the market moved too fast, leaving a gap between candles that price is drawn back to fill. Acts as a magnet, pulling price back to “fill” the imbalance. |
| Order Block (OB) | The specific origin candle of that fast move. Acts as the springboard, pushing price away once it returns and the FVG is filled. |
| FVG Inside OB | The highest-probability scenario. The FVG sits directly inside or in front of the OB, confirming institutional interest at a very specific price level. |
The trading sequence: Identify the OB. Confirm the FVG. Wait for price to return and fill the FVG within the OB zone. Enter on the rejection. This sequence keeps you aligned with institutional activity and eliminates the majority of false signals.
When combining the two concepts, the FVG reveals where the imbalance is, and the OB confirms where smart money is likely to defend. Together, they produce a confluence-backed setup that is far more reliable than either concept used in isolation.
9. Order Blocks vs. Breaker Blocks
Once you are comfortable with order blocks, it is important to understand Breaker Blocks, a related but distinctly different market structure concept.
What Is a Breaker Block?
A breaker is a swing low (in a bearish scenario) or swing high (in a bullish scenario) that initially launches a strong move, creating a new high or low, but then gets broken when price reverses and trades back through that original swing point, creating a lower low or higher high. Once broken, that original swing level becomes a potential retracement target called a “breaker,” where we expect price to return before continuing the new directional move.
Visually, order blocks appear as individual candles or a small series of candles that preceded a significant move. Breakers appear as horizontal levels at previous swing highs or lows that have since been violated.
| Feature | Order Block | Breaker Block |
| Formation | Last opposing candle before a strong directional move | original swing point broken by price reversing through it |
| Visual ID | Specific candle or short candle series at a swing point | Horizontal level at a violated swing high/low |
| Market Context | Institutional footprint before a breakout | Broken structure that now acts as a retracement magnet |
| Entry Timing | Wait for price to return to the originating candle zone | Wait for price to retrace to the broken swing level |
| Stop Placement | Just beyond the block boundary | Beyond the breaker zone, accounting for manipulation |
| Reliability | Higher reliability: clearer boundaries, more predictable | Lower reliability: variable retracement depth, more experience required |
| Frequency | More frequent across all timeframes | Less frequent, requires structural break first |
| ⚠️ Recommendation | Order blocks generally provide more consistent and manageable setups due to clearer boundaries and more predictable price behaviour. Breakers require more experience and context to trade effectively. Master OBs first. |
10. Advanced Concepts: Why Some Order Blocks Fail
1. Order Flow Is King
An Order Block is a roadmap. Order Flow is the traffic. If order flow is bullish, meaning price is hunting buy-side liquidity above recent highs, do not try to sell at a bearish order block. The institutional momentum will run over it. Always trade in line with where the liquidity is likely to be collected next. When OBs and order flow align, win rates rise dramatically. When they conflict, OBs become traps.
2. The Liquidity Pool Danger
If an order block sits directly next to a liquidity pool, such as a cluster of equal highs, equal lows, or a double top/bottom, approach with extreme caution. The market algorithm is designed to sweep these liquidity pools before reversing. If your OB is near such a pool, wait for the sweep to occur first, then look for your setup. Entering before the sweep is premature and will result in getting stopped out before the actual move.
3. Propulsion Blocks
A Propulsion Block is a candle that trades into an existing Order Block and reacts immediately, acting as a secondary layer of support or resistance.
- Bullish Propulsion Block: A candle that taps a Bullish OB and immediately acts as support for higher prices, reinforcing the OB’s strength.
- Bearish Propulsion Block: A candle that taps a Bearish OB and immediately acts as resistance for lower prices, confirming the OB is still holding.
Propulsion blocks indicate that the original OB has not been exhausted and that institutional interest at that level remains active.
4. Institutional Accumulation: Why Blocks Appear Where They Do
Smart money traders use order blocks to execute large trades without dramatically moving the market. Because institutions trade in massive volumes, they cannot buy or sell their entire position in one transaction because doing so would cause significant slippage and unfavourable price movement. Instead, they accumulate or distribute orders over time across a specific price area, which is precisely what creates the order block. For retail traders, identifying these accumulation zones offers a powerful opportunity to trade alongside smart money rather than against it.
11. Common Mistakes to Avoid
- Ignoring Market Structure: Always trade order blocks in line with the overall trend. Going against the trend dramatically increases the failure rate, regardless of how clean the OB looks in isolation.
- Entering Without Confirmation: Never jump into a trade without a reversal pattern or confluence. The MSS on a lower timeframe, a rejection candle, or an FVG alignment are what separate high-probability entries from gambling.
- Ignoring Higher Time Frames: Use higher time frames (4-hour or daily) to identify the most reliable order blocks. Lower time frames produce more noise and more false signals.
- Overtrading: Not every revisit to an order block will produce a profitable trade. Be selective. Only trade the setups with multiple confluences stacking in your favour.
- Trading OBs Near Unswept Liquidity: If there is a visible pool of liquidity (equal highs, equal lows) sitting between your entry and your target, wait. The algorithm will sweep it before respecting your OB.
12. Building Your Order Block Trading Plan
Preparation Phase
- Check the economic calendar for high-impact news events. Avoid trading OBs into major releases.
- Identify the HTF (4H/Daily/Weekly) trend and determine the dominant order flow direction.
- Mark all potential OBs on the HTF chart and note whether FVGs are present.
Analysis Phase
- Confirm that your selected OB aligns with the broader market structure and order flow.
- Verify the FVG is present and measure the specific entry price (open or 50% of candle body).
- Check for nearby liquidity pools that could disrupt the trade before it reaches target.
Execution Phase
- Set your limit order at the OB entry price with stop loss beyond the block boundary.
- When price enters the OB zone, drop to a lower timeframe and wait for the MSS.
- Confirm rejection (pin bar or engulfing) before considering a market entry if limit was not triggered.
Management Phase
- Once the trade is live, move stop to break-even after price has moved 1R in your favour.
- Let the trade breathe because institutional moves are not instant; premature exits kill the R:R.
- Scale out at the 50% retracement of the liquidity void, then let the remainder run to the full target.
Review Phase
- Log every trade in a trading journal: OB location, FVG presence, order flow alignment, outcome.
- Review failed OBs to identify common patterns: were they near liquidity pools? Against order flow? Missing FVGs?
- Backtest: find 20 historical examples of each setup type before trading live.
Download the Guide:
📥 Download the Complete Order Block PDF Guide
Conclusion
Order Blocks represent one of the most powerful frameworks available to retail traders for understanding and acting on institutional market behaviour. By learning to identify precisely where large market participants have left their footprints. By waiting patiently for price to return to those zones, you gain access to high-probability setups that most retail traders never see.
The complete formula for Order Block trading success is threefold:
- Identification: Find valid blocks confirmed by FVGs and a Break in Market Structure.
- Context: Trade exclusively with the dominant Order Flow and never against it.
- Execution: Enter on a lower-timeframe MSS or rejection pattern, set precise stops and realistic targets.
Extend your understanding by incorporating Breaker Blocks for complex structural scenarios, Propulsion Blocks as secondary confirmation layers, and Fair Value Gap analysis as your primary confluence tool. These concepts do not compete. They compound, each one adding another layer of confidence to your setups.
The institutional traders have left their footprints on your charts. Now you know exactly how to read them.
Appendix: Key Terms Glossary
| Term | Definition |
| Order Block (OB) | A lower-timeframe break of structure is used to confirm entry timing when price returns to an OB zone. |
| Fair Value Gap (FVG) | A price inefficiency (three-candle pattern) where the market moved too fast, leaving an imbalance that price is later drawn back to fill. |
| Break in Market Structure (BMS) | When price breaks a previous significant high (bullish) or low (bearish), confirming a directional move. |
| Market Structure Shift (MSS) | A lower-timeframe break of structure used to confirm entry timing when price returns to an OB zone. |
| Liquidity Pool | An area where stop losses accumulate, typically at previous highs, lows, equal highs, or equal lows. |
| Liquidity Void | An area of minimal price action created by a sharp, fast directional move. Acts as a magnet pulling price back. |
| Breaker Block | A previously valid swing point that was broken by price, now acting as a retracement target and potential resistance/support. |
| Propulsion Block | A candle that taps an existing OB and reacts immediately, serving as a secondary institutional confirmation layer. |
| Order Flow | The directional bias of institutional activity, specifically whether smart money is hunting buy-side or sell-side liquidity. |
| Smart Money Concepts (SMC) | A trading framework built around understanding and following institutional market behaviour. |