What are order blocks for forex?
Order Blocks in forex are a change in the state of price delivery validated by fair value gaps and indicated on the forex chart by the last bullish candle in a swing high that forms the highest high before the down move, if it is a bearish order block. Conversely, a bullish order block is represented by the last bearish candle in a swing low that forms the lowest low before the up move. These areas of order blocks represent where big participants and large banks have placed their orders in the form of sell limits, buy limits, or pending orders.
In Forex, there are two types of order blocks: a bearish order block and a bullish order block. In a bullish order block, we anticipate taking long (buy) positions, and in a bearish order block, we anticipate taking short (sell) positions.
How to refine order blocks
You refine order blocks by focusing on order blocks with fair value gaps that align with market structure. For example, if you have a bearish order block with a fair value gap, ensure you also have a bearish market structure. The opposite is true when you have a bullish order block with a fair value gap; make sure you also have a bullish market structure before making entries.
Are order blocks the same as supply and demand?
No, order blocks and supply and demand zones are not the same, although they share some similarities. Here’s the difference:
- Order Blocks: These are typically associated with institutional trading and represent areas where large institutions place their orders (buying or selling) that move the market. They are often linked to price imbalances and the behavior of “smart money,” and are considered part of a smart money trading strategy.
- Supply and Demand Zones: These are broader areas on a chart where the market experiences an imbalance between buyers and sellers. A supply zone represents an area where sellers overpower buyers (causing price to drop), and a demand zone is where buyers outnumber sellers (causing price to rise).
In short, order blocks are more precise and focused on institutional activity, while supply and demand zones are more general price areas where buyer/seller imbalances occur. However, both concepts aim to identify key reversal points in the market.
Order Block PDF
Download this free Order block pdf This complete PDF guide
Course Bundle
Up To 50% Off
Access all courses with a once-off purchase.
Benefits

This video will help you understand exactly what order blocks are in forex. The Content written in this blog is not included in this video. Therefore, we recommend reading the blog after watching the video.

Validation of order blocks in forex?
A bullish order block in forex is validated when the high of the lowest down candle (Bearish Candle) is engulfed by a later-formed candle. A bearish order block is validated when the low of the highest up candle (Bullish Candle) is engulfed by a later formed candle.
Bullish and Bearish Order Blocks
Generally, bullish and bearish order blocks are defined according to their influence on price; if price reaches a certain order block and we see a price decline, we call that a bearish order block. Conversely, if price reaches a certain order block and we see price go long, that is a bullish order block. Price’s reaction determines whether an order block is bullish or bearish. In summary, the final up candle that makes the highest high before the down move forms a bearish order block, while the final down candle that makes the lowest low before the up move forms a bullish order block.
How to trade order blocks in forex
In forex, if price trades higher away from the bullish order block(OB), creating a liquidity void, and then later returns to the bullish OB, thus closing the previously created liquidity void as price was trading away from the bullish OB; this will be bullish, so we will anticipate buying setups in the market using the bullish OB as an initial entry point.
This Picture Indicates a bearish OB in the Forex chart.
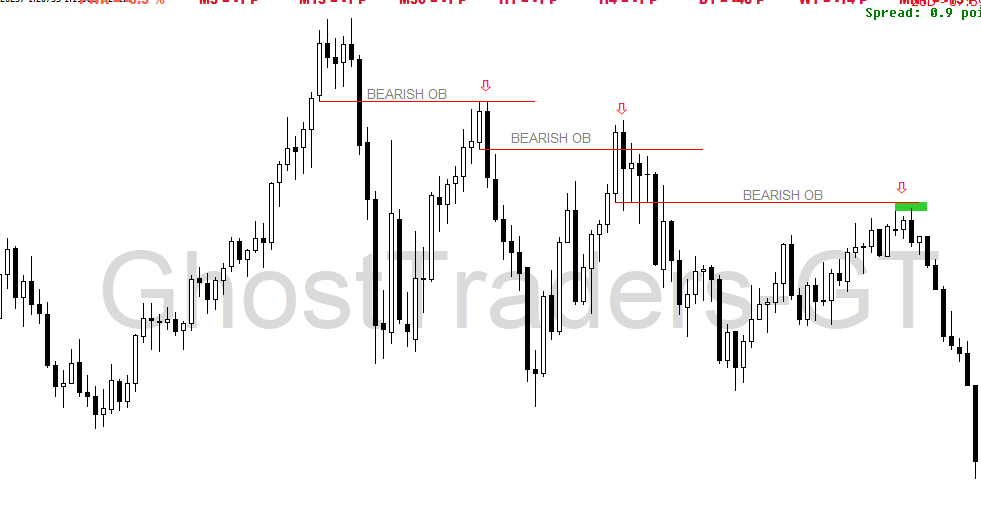
When price trades lower away from the bearish order block(OB) in forex, it creates a liquidity void and then returns to the bearish order block. thus, closing the previously created liquidity void, as price was trading away from the bearish OB; this will be bearish, and we will anticipate selling setups in the market using the bearish OB as our entry level.
The stop loss is set at the low of a bullish OB. If we are in a bearish OB, our stop loss will be at least 5 pips from the high of the bearish order block.
How To Trade Bearish Order Blocks In Forex
We look for sell setups in the market using the bearish order block as our point of reference to sell short when price trades lower away from the bearish order block, creating a liquidity void, and then later returns to close the previously created liquidity void as price was trading away from the bearish order block.
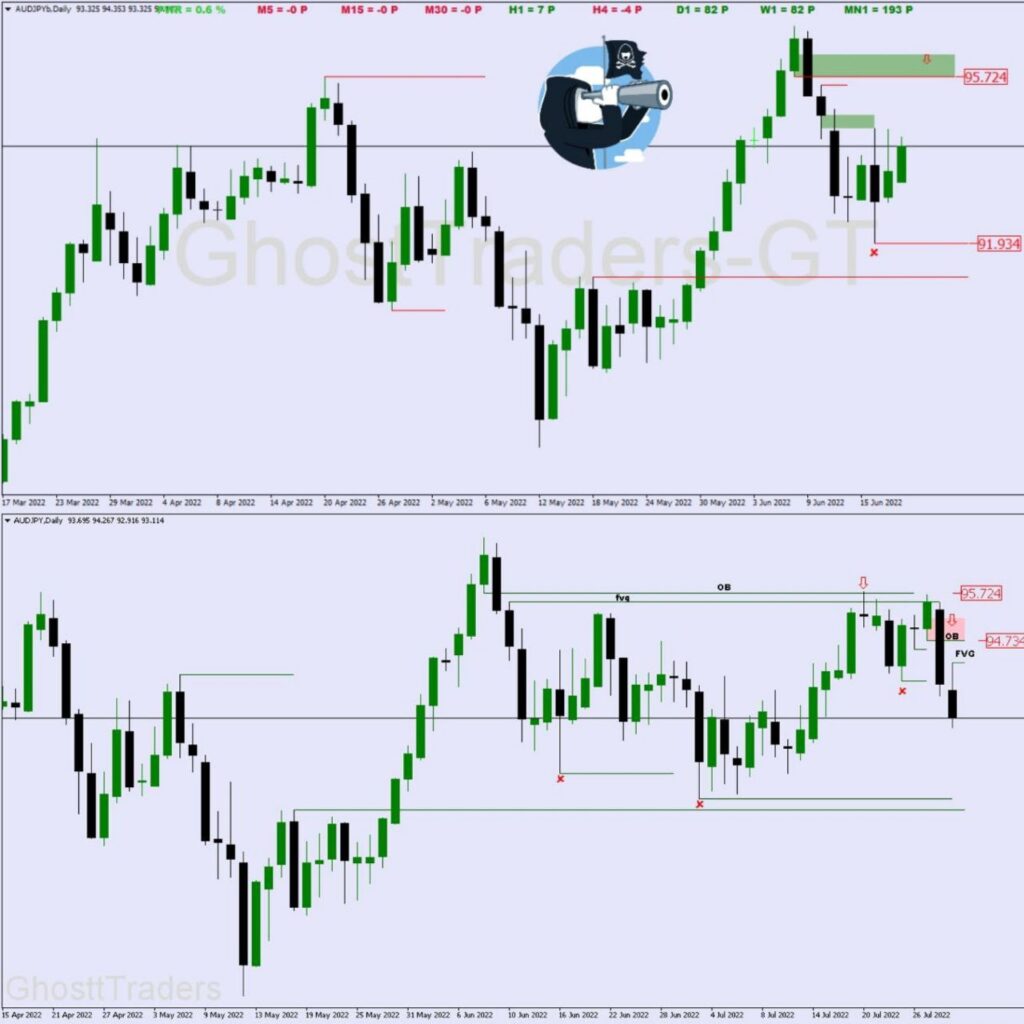
The Below Chart Example of the bearish order block shows us a trade setup. The reason we were anticipating a sell position is not only based on bearish order blocks, but for the sake of this discussion, let’s focus on order blocks only. Your task now is to go back and backtest, focusing on order blocks and order flow trading.
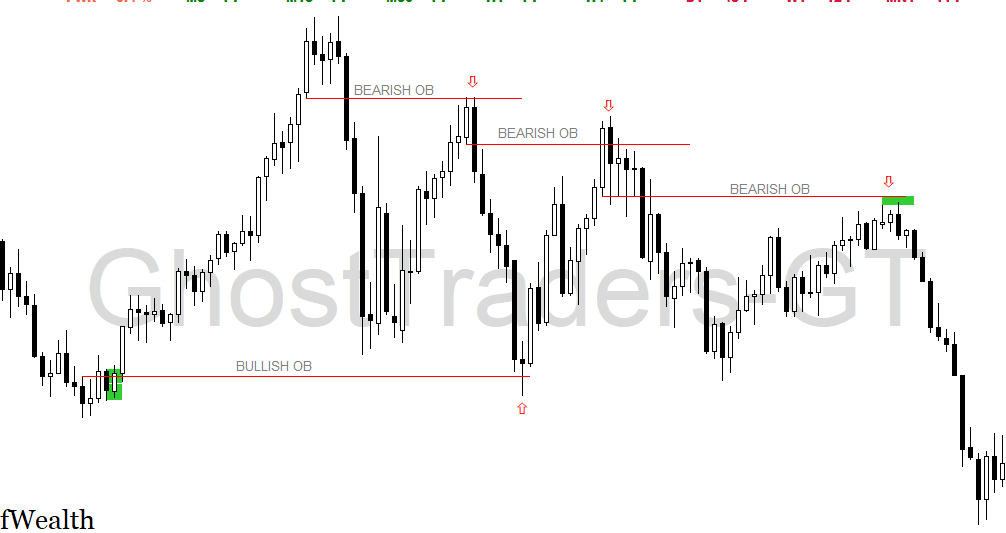
How To Trade Bullish Order Blocks In Forex?
We look for sell setups in the market using the bearish order block as our point of reference to sell short when price trades lower away from the bearish order block, creating a liquidity void, and then later returns to close the previously created liquidity void as price was trading away from the bearish order block.

The Below Chart Example of the bullish order block shows us a trade setup using a bearish order block. We were anticipating a buy position not only based on the bullish order block, but for the sake of this discussion, let’s focus on order blocks only. Your task now is to go back and backtest, focusing on order blocks and order flow.

Why Order Blocks Fail
The context surrounding order blocks is what makes order blocks successful; not every down or up close candle before the down or up move is an order block. An order block without a fair value gap is not an order block, and it’s not worth trading. The context surrounding an order block makes it successful because it has to be validated by a fair value gap. It needs other institutional trading concepts, such as order flow, to refine which order block is most likely to fail or succeed.
The Importance of Order Blocks
Order Blocks play a key role in price delivery algorithm by being a reference point to either go long(buy) or go short(sell) on a particular trading pair by big participants in the foreign market. The market is not random, price is engineered, meaning there’s a price delivery algorithm that feeds on liquidity; This is why order blocks should be traded with a clear understanding of order flow.
Order Flow Trading with Order Blocks
Order Flow is a trading concept that focuses on which side of the market price is most likely going to collect liquidity; This could be either sell-side liquidity or buy-side liquidity. If price collects sell-side liquidity, we are anticipating a bearish order flow, and if price collects buy-side liquidity, we are anticipating a bullish order flow.
Liquidity Pools rest on previous highs and previous lows. This could be in the form of a pending order or stop loss; therefore, sell-side liquidity is simply the liquidity pools resting on previous lows, while buy-side liquidity is simply the liquidity pools on previous highs. This is referred to as a break in market structure(B.M.S) or shift in market structure(SM.S) in forex.
The Understanding of order flow helps you understand where price is most likely to collect liquidity. With that understanding, you can avoid order blocks that are residing on the side of the market where price is most likely going to collect liquidity. meaning that based on order flow, we can trade order blocks in line with where the market is.
When Order Flow is bearish, avoid looking for bullish order blocks; instead, look for bearish order blocks to trade. And when order flow is bullish, look for bullish order blocks and avoid bearish order blocks to trade.
Liquidity pools and liquidity voids in Trading Order Blocks
Liquidity pools and liquidity voids are part of the institutional trading concepts that add to the context surrounding order blocks. Liquidity Pools are areas in the market where price will be drawn to either collect sell-side liquidity or buy-side liquidity. Liquidity rests on previous highs and lows. Equal highs or relatives equal turns to have a lot of liquidity, and price is drawn to it because the price delivery algorithm feeds on liquidity.
There’s a lot of liquidity because where the money is, either in the form of stops or pending orders, price is highly manipulated. In such areas, we see stop runs or fake-outs. Therefore, avoiding orders residing in areas where there are many liquidity pools will help avoid unnecessary trading losses.

Liquidity voids are areas in the market where there’s less price action due to market volatility. This could be caused by high-impact news or institutional reference points, such as higher time frame order blocks or fair value gaps. Due to the liquidity void, we tend to have an imbalance in the market; therefore, price will retrace to balance or close the liquidity void that has been created and continue in its direction. As a trader is to look for order blocks nearby, that price will be used as a point of reference to either sell or buy after a price has retraced to close the void that has been created.
High Probability Order Blocks
- OB with a Fair Value Gap is ideal
- An OB that lineup with Order Flow is ideal
- An OB with a Clean Liquidity Void
Order blocks that are most likely to fail
Order Block Near Resting Liquidity Pools: If an order block is close to liquidity pools (e.g., areas with stop-loss orders or significant buying/selling interest), it may be targeted by the market, leading to price manipulation and failure of the order block.
Order Block Without a Fair Value Gap (FVG): An order block lacking a fair value gap is not a true order block. FVG represents price inefficiency, indicating unfilled institutional orders, and without it, the order block is less likely to hold.
Order Block Not in Line with the Order Flow: If the order block goes against the current order flow or market structure, it is likely to fail. Always align the order block with the dominant trend or directional bias of the market.
Course Bundle
Up To 50% Off
Access all courses with a once-off purchase.
Benefits
Propulsion Block
A bullish propulsion block is a candle that trades down into a bullish order block, which acts as a support for higher price movements.
A bearish propulsion block is a candle that has previously traded up into a bearish order block and is acting as resistance for lower prices.
Conclusion:
Order blocks represent one of the most powerful approaches to trading forex with institutional logic. By understanding where large players position their orders, you gain insight into future price movements that most retail traders miss.
The key to success with order blocks lies in:
- Correct Identification – Finding valid order blocks with fair value gaps
- Proper Context – Trading with the dominant order flow and market structure
- Disciplined Execution – Following your rules without deviation
- Continuous Learning – Refining your approach through analysis and practice
Remember that mastery takes time. Start by practicing order block identification on historical charts, then paper trade until you achieve consistent results. Only then should you apply this strategy with real capital.
The institutional traders have left their footprints on your charts—now you know how to read them and trade alongside the smart money.
Appendix: Key Terms and Definitions
Order Block: A specific candle representing where institutional orders have been placed, serving as a key reference point for future price movements.
Fair Value Gap: A price inefficiency where candles don’t overlap, indicating strong institutional interest and imbalance in the market.
Liquidity Pool: Areas where stop losses accumulate, usually at previous highs and lows, attracting price movement.
Liquidity Void: Areas with minimal price action, often created after sharp moves away from order blocks.
Order Flow: The directional bias of institutional activity, indicating where price is likely to collect liquidity next.
Market Structure: The pattern of higher highs/higher lows (bullish) or lower highs/lower lows (bearish) that provides context for order blocks.
Propulsion Block: A candle that interacts with an order block and immediately confirms its validity through price action.
Break in Market Structure (BMS): A change in the established pattern of highs and lows, potentially signaling an order flow shift
Hey, Check Our Instagram account and stay updated.
Related post: How to Trade Mitigation Block and Breakers